Skip to Main Content

Coastal Carolina logo

UNIVERSITY LIBRARIES

Makerspace

Vector Graphics

Vector Graphics

There exists two main types of digital graphics; vector and bitmap graphics. Although you may not be familiar with the name, surely you have encountered bitmap graphics before. Bitmap graphics are composed of a grid of pixels. Most images you encounter online are bitmap images, and if you've ever designed graphics in MSPaint or Photoshop you were designing bitmap graphics.

So what are vector graphics? Unlike bitmap graphics, the features in vector graphics are defined by precise paths (described by mathematical expressions under the hood) called vectors. Because vector graphics lack pixels they can be scaled up or down without loosing definition. To identify whether a graphic is a bitmap or vector, you can open the graphic in image editing software and zoom in.
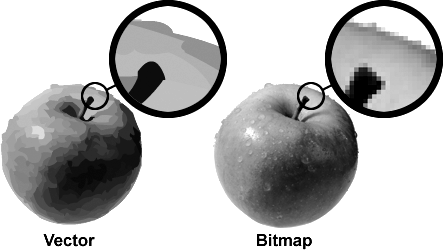
A figure illustrating the difference between Vector and Bitmap graphics.

Converting a Bitmap to a Vector Graphic

Inkscape includes a convenient tool to convert bitmap images into vector graphics. Simply navigate to "Path" > "Trace Bitmap..." or type Shift+Alt+B.

Academic Engagement Librarian, Tristan Daniels, has recorded a video showcasing the process.

The Inkscape UI

The Inkscape UI

Basic Navigation

- Use the scroll wheel to navigate up and down the document

- Use scroll + Ctrl to zoom in and out

- Click and drag to select enclosed vectors

The default layout of Inkscape with the most common tools labeled.

Designing for the Laser Cutter - Engrave a Business Card

Demo Project - Laser Engrave a Business Card

If you intend to use your 2D CAD skills to do some laser cutting, build this demo!


Requirements:

- You must include your full name

- You must include a bitmap image

- You must have at least one engraved feature and one cut feature (not including the outline)


Steps:

  1. Draw the outline of the business card. The typical business card has dimensions of 3.5" x 2". Select "create rectangles and squares" or type the hotkey "R". Choose whether you 
    1. Ensure that you are using either a stroke or a fill, but not both. 
    2. If you want to give your business card rounded edges, select "edit paths by nodes" or type the hotkey "N". Select a corner and pull it to give it a rounded edge.
  2. Type your contact info. Select "create text objects" or hotkey "T". Choose a font you like and enter your name, email, phone number or any other info you want to include. 
    1. Ensure that the text is a unique color, different from the business card outline. 
    2. Convert the text object into a vector. Select the text then navigate to "Path">"Object to Path" or use hotkey Shift+Ctrl+C.
  3. Add a bitmap image. Browse the internet for an image which represents you. Import the image into your Inkscape design with hotkey Ctrl+I.
    1. Convert the bitmap to a vector. Select the image then navigate to "Path">"Trace Bitmap..." or use hotkey Shift+Alt+B. Select "Edge detection" from the dropdown. You may have to play with the threshold values and click "Update" until you get something you are happy with. Click "Apply" to create the vector.
    2. Click and drag the new vector to move it away from the bitmap image. Select and delete the bitmap image. We no longer need it.
    3. Ensure that the image has a unique color. 
  4. Continue adding customizations until you are happy. You can add spirals, patterns, geometric shapes, zig-zags, anything you like!
    1. Remember to give each feature a unique color. 
    2. When you finish be sure to save as an SVG.
An example of a finished design in Inkscape. Notice that each feature has a unique color.
An example of a finished business card laser engraved on Medium Density Fiberboard (MDF).

Saving the File

Saving your File

From Inkscape, click "File" > "Save As...". You'll notice that by default Inkscape likes to save vector graphics in their own proprietary format called "Inkscape SVG". Generally, vector graphics are saved in Plain SVG (Scalable Vector Graphic) format. The difference is that Inkscape SVGs support layers while Plain SVGs do not. If your sketch uses multiple layers and you want to be able to preserve these layers for later editing leave the format as Inkscape SVG.  

Which format should I use?

For Laser Cutting - Save as an Inkscape SVG or Plain SVG

For Vinyl Cutting - Save as a .dxf file (Desktop Cutting Plotter AutoCAD DXF R12)